| Es6 | 您所在的位置:网站首页 › axios post 请求头设置 › Es6 |
Es6
|
请求方式
jQuery:比较重,如果需要另外引入不建议使用axios:轻量级,建议使用
封装XmlHttpRequest对象的ajaxpromise风格可以用在浏览器端和node服务器端
axios
Axios 是一个基于 promise 的 HTTP 库,可以用在浏览器和 node.js 中。 axios本质上也是对原生XHR的封装,只不过它是Promise的实现版本,符合最新的ES规范 特性 从浏览器中创建 XMLHttpRequests从 node.js 创建 http 请求支持 Promise API拦截请求和响应转换请求数据和响应数据取消请求自动转换 JSON 数据客户端支持防御 XSRF引入 GET请求 // 为给定 ID 的 user 创建请求 axios.get('/user?ID=12345') .then(function (response) { console.log(response); }) .catch(function (error) { console.log(error); }); // 上面的请求也可以这样做 axios.get('/user', { params: { ID: 12345 } }) .then(function (response) { console.log(response); }) .catch(function (error) { console.log(error); });POST请求 axios.post('/user', { firstName: 'Fred', lastName: 'Flintstone' }) .then(function (response) { console.log(response); }) .catch(function (error) { console.log(error); });执行多个请求 function getUserAccount() { return axios.get('/user/12345'); } function getUserPermissions() { return axios.get('/user/12345/permissions'); } axios.all([getUserAccount(), getUserPermissions()]) .then(axios.spread(function (acct, perms) { // 两个请求现在都执行完成 })); 添加请求头 准备工作1. 创建一个名为db.json的文件,把网站的数据复制进去。 { "posts": [ { "id": 1, "title": "json-server", "author": "typicode" } ], "comments": [ { "id": 1, "body": "some comment", "postId": 1 } ], "profile": { "name": "typicode" } }2.启动命令:json-server --watch db.json
3.访问http://localhost:3000/posts 下面页面为成功
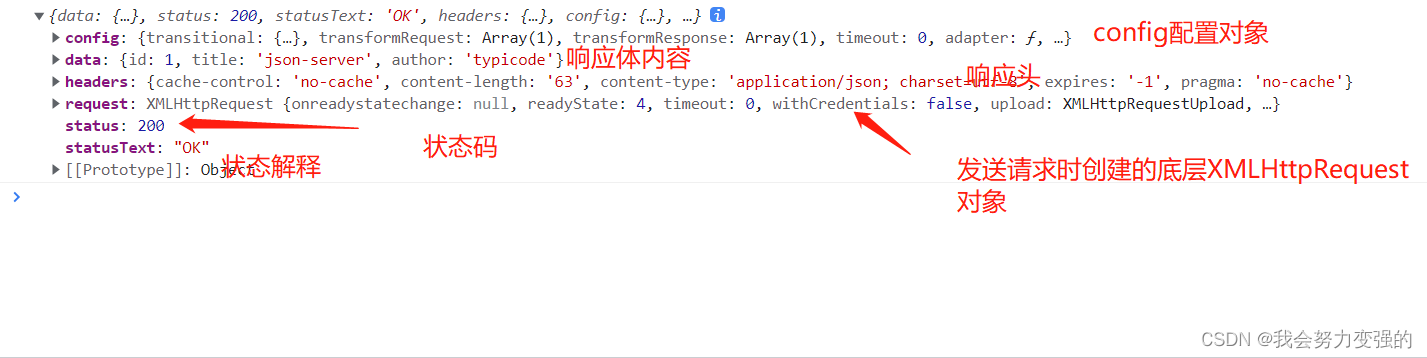
4.使用cdn的方式引入axios 5.创建页面,配置各种请求 //其他发送请求的api document.getElementById("btn5").onclick = function(){ //发送get,使用get,第一个参数时url,第二个参数时config配置对象 axios.get("http://localhost:3000/posts/1") .then(response=>{ console.log(response); }) }; //发送post document.getElementById("btn6").onclick = function(){ //发送post请求,第一个参数时url,第二个参数时请求体,第三个参数时config配置对象 axios.post("http://localhost:3000/posts", {title:"axios学习2", author:"Yehaocong2"}) .then(response=>{ console.log(response); }) }; //发送put, document.getElementById("btn7").onclick = function(){ //发送put,接收三个参数,url 请求体 、 config配置对象 axios.put("http://localhost:3000/posts/2",{title:"axios学习", author:"Liaoxiaoyan"}) .then(response=>{ console.log(response); }) }; document.getElementById("btn8").onclick = function(){ //发送delete请求,接收2个参数, url config配置对象 axios.delete("http://localhost:3000/posts/3") .then(response=>{ console.log(response); }) };
1. 有哪些配置项 { // 路径url url: '/user', // 请求方法,默认get method: 'get', //基础url,最终请求的url是 baseURL+url拼接,所以再全局设置默认,可以使得发送请求时的url变得简洁 baseURL: 'https://some-domain.com/api/', //设置请求头 headers: {'X-Requested-With': 'XMLHttpRequest'}, //设置请求url的query参数,可以使得url简洁。 //比如url是https://some-domain.com/api/user 然后params如下设置,那么最终的url是: //https://some-domain.com/api/user?ID=12345&name=Jack params: { ID: 12345, name:"Jack" }, //设置请求体 data: { firstName: 'Fred' }, //设置请求的另外一种格式,不过这个是直接设置字符串的 data: 'Country=Brasil&City=Belo Horizonte', //请求超时,单位毫秒,默认0,不超时。 timeout: 1000, //响应数据类型,默认json responseType: 'json', //响应数据的编码规则,默认utf-8 responseEncoding: 'utf8', //响应体的最大长度 maxContentLength: 2000, // 请求体的最大长度 maxBodyLength: 2000, }2.配置baseURL 可以设置全局默认配置,是为了避免多种重复配置在不同请求中重复,比如baseURL、timeout等,这里设置baseURL 默认配置 axios.defaults.baseURL="http://localhost:3000"; //因为上面配置了baseURL,所以我们之后的请求只需要配置url不用像之前那样的全路径 axios.get("/posts/1") .then(response=>{ console.log(response); }) axios拦截器拦截器:实质就是函数【拦截器并不是拦住之后,不让继续往下走;而是拦截之后添加操作,然后继续向下执行】 分为两种类型: 请求拦截器:用于拦截请求,自定义做一个逻辑后再把请求发送,可以用于配置公用的逻辑,就不用每个请求都配一遍【axios.interceptors.request】响应拦截器:用于拦截响应,做一些处理后再出发响应回调【axios.interceptors.response】语法格式: axios.interceptors.request.use((成功的回调)=>{ return 成功的结果 },(失败的回调)=>{ return 失败的结果 }1. 添加简单的拦截器 axios拦截器 //这个是设置请求拦截器的api,传入两个回调,第一个成功回调,第二个失败回调。 axios.interceptors.request.use( config=>{ console.log("请求拦截器1调用成功"); return config; }, function(error){ console.log("请求拦截器1调用失败"); return Promise.reject(error) } ) //这个是设置响应拦截器的api,第一个成功回调,第二个失败回调 axios.interceptors.response.use( function(response){ console.log("响应拦截器1调用成功"); return response; }, function(error){ console.log("响应拦截器1调用失败"); return Promise.reject(error); } ) axios.get("http://localhost:3000/posts/1") .then(function(response){ // console.log("请求回调成功"); }).catch(function(error){ console.log("请求回调失败"); })2. 添加headers头的请求拦截器 // 配置请求信息 axios.defaults.baseURL="http://localhost:3000"; // 请求拦截 axios.interceptors.request.use(config=>{ //接受JSON数据格式 config.headers['Content-Type'] = 'application/json;charset=utf-8'; // 设置请求头 // config.headers['token'] = localStorage.getItem("loginUserInfo").token; 获取localStroage中的token值 config.headers['token'] = 'hello token'; // 简单获取字符串 console.log("请求拦截器1调用成功"); console.log(config); // 输出拦截器添加的信息 return config; },error=>{ console.log("请求拦截器1调用失败"); return Promise.reject(error) } ) //发送get document.getElementById("btn1").onclick = function(){ axios({ method:"GET", url:"/posts/1" }).then(response=>{ console.log(response); }) };
|


【本文地址】
公司简介
联系我们